
You can make a litter box from a sturdy plastic tray or storage bin. Start with enough floor space for your cat to turn comfortably, an entrance that is easy to step over, and smooth surfaces you can wash thoroughly.
A low-sided tray may be ready to use after cleaning. A taller bin can help contain scattered litter and urine directed over the back, but it may need a lower entrance. Here is how to choose between the two, prepare the container, and introduce it without disrupting your cat’s routine.
1. Pick a Design That Fits Your Cat
A low-sided tray
A broad under-bed storage tray or suitable mixing tray can work without cutting. Look for a flat base, a smooth interior, and a rim your cat can step over easily. Low sides help small kittens and cats with limited mobility, although more litter may escape when your cat digs.
A tall bin with a low entrance
Taller back and side walls can contain more scattered litter and urine that would otherwise go over the rim. Keep the top open and lower one side for access if needed. Cutting requires extra care because it can leave sharp edges or weaken the wall.
You do not need to make a litter box with high sides if your cat finds climbing difficult. Choose the entrance height separately from the wall height. A lower step should remain easy to use even when the back and sides are taller.
2. Measure Before You Make a Litter Box
Use a box length of about 1.5 times your cat’s length from nose to tail base as a starting point. For a cat measuring 16 inches along that length, look for roughly 24 inches of usable box length. The Ohio State indoor-cat guide also recommends a box about one and a half times the cat’s length. Allow enough width for your cat to turn and squat comfortably.
Measure the inside floor, not the outside rim or the capacity printed on the label. Sloping walls, wheel recesses, and molded ridges can reduce usable space. Your cat should be able to enter fully, turn, dig, and leave without squeezing against the sides.
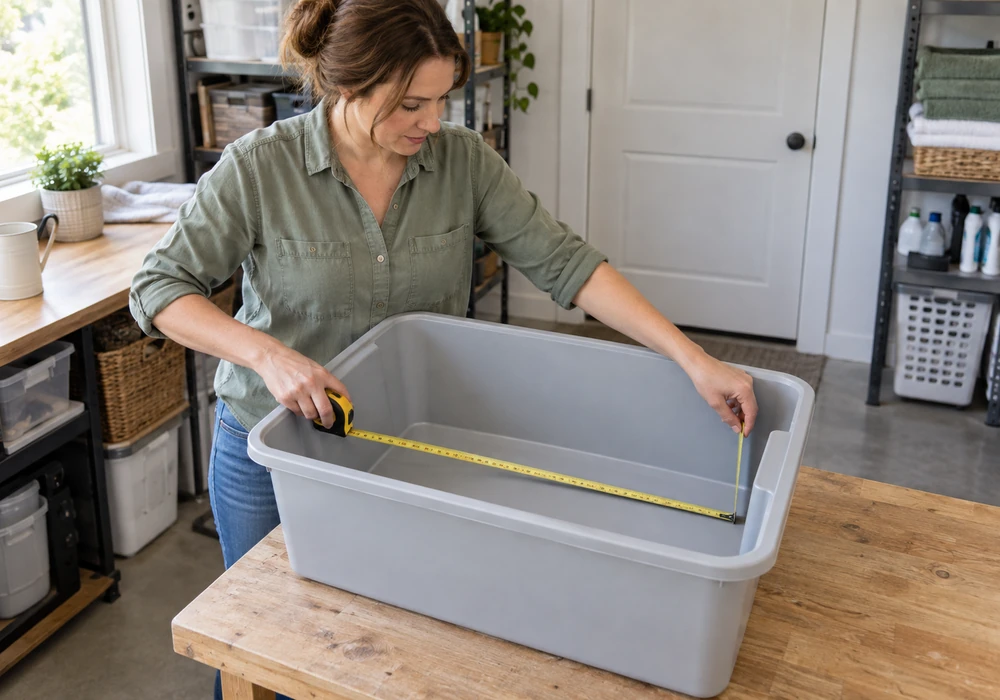
Plan the entrance around the litter level. Leave a strip of wall below the opening to hold litter inside. Keep the floor and the curved corner where it joins the wall intact. The remaining step must still be low enough for your cat; there is no doorway size that suits every cat.
Start with the litter type and depth your cat already accepts. Published guidance varies from about 1.2 inches (3 cm) to 2 inches (5 cm), so use your cat’s comfortable digging and covering as the practical guide. Cats Protection, for instance, recommends 3 cm (about 1.2 inches) as a depth most cats prefer: deep enough to dig, shallow enough not to feel unstable. If the litter spills through a low entrance, consider a different tray or a catch mat rather than raising the step beyond your cat’s ability. If the cat using the box is a kitten, our guide to safe litter for kittens covers which litters are worth avoiding.
Estimate the first fill: for a rectangular floor, length × width × litter depth in centimeters ÷ 1,000 gives an approximate volume in liters. A 60 × 40 cm floor with a 3 cm layer takes about 7.2 liters. Tapered containers will differ, and this calculation does not tell you the filled box’s weight.
3. What You Need to Make a Litter Box
Choose a container with a known history, a smooth interior, and walls that stay firm during handling. Intact containers made from high-density polyethylene (HDPE) or polypropylene (PP) may work, but the recycling code alone does not establish strength or suitability.
Reject brittle plastic, cracks, rough seams, persistent strong odors, and containers that held pesticides, solvents, or other hazardous chemicals. Avoid cardboard, unsealed wood, or fiberboard as the part that holds litter and urine. A properly finished stainless-steel pan is another option if its size and entry height suit your cat; follow its cleaning instructions.
Supplies for either design
- A suitable container with the lid removed
- A tape measure, familiar litter, and a scoop
- Mild dish detergent, water, and a cleaning brush
- A flat, washable, slip-resistant mat if needed
Extra tools for cutting an entrance
- A marker, ruler, and cardboard doorway template
- A stable work surface and suitable supports or clamps
- A cutting tool intended for the plastic and wall thickness
- A suitable file or abrasive, eye protection, and a way to collect shavings and dust
Removing part of the rim can weaken thin plastic. If the wall bends excessively or cracks, choose another container. Keep the finished box dedicated to litter use; do not later use it to store food. Our overview of basic cat care sets out how the box, feeding area, and resting spots fit together in a daily routine.
4. Make a Litter Box With or Without Cutting
Method 1: Prepare a Low-Sided Tray
- Inspect the empty tray. Remove the lid and loose attachments. Check the rim, seams, corners, and bottom for damage or sharp projections.
- Wash and check for leaks. Wash with mild dish detergent, rinse thoroughly, and add a shallow layer of water to check the base and lower walls. Empty and dry it completely.
- Set it up and check stability. Place it on a level surface, using a flat nonslip mat if needed. Add familiar litter and confirm that the tray stays level without rocking or sliding.
Method 2: Cut a Low Entrance in a Storage Bin
- Mark the entrance before cutting. Draw a broad U-shaped opening from the top rim downward, with rounded lower corners. Leave a continuous strip of wall below it, above the intact floor-to-wall corner. Use a cardboard template to assess the width and step height.
- Check that the wall will remain strong. The cut must not enter the base or leave the side unstable. If you cannot retain both a usable entrance and a firm container, choose a different bin.
- Secure the empty bin. Keep cats and children out of the work area. Support and clamp the plastic without crushing it, wear eye protection, and keep your hands and body outside the cutting path. Follow the tool manufacturer’s instructions.
- Cut with an appropriate tool. Use a tool intended for that plastic and thickness. Stop if the plastic splits, melts, or becomes difficult to control. Do not force the blade or use a heated knife, flame, or improvised melting method.
- Smooth the entire cut edge. Remove sharp ridges and fragments with a suitable file or abrasive. Finish each corner, inspect under good light, and use a folded cloth to check for snags. Do not test a questionable edge with bare fingers.
- Clean and check the finished bin. Collect all shavings and dust from the bin and work area. Wash, rinse, and check for leaks with shallow water below the entrance. Dry completely, add familiar litter, and check stability on a level surface.
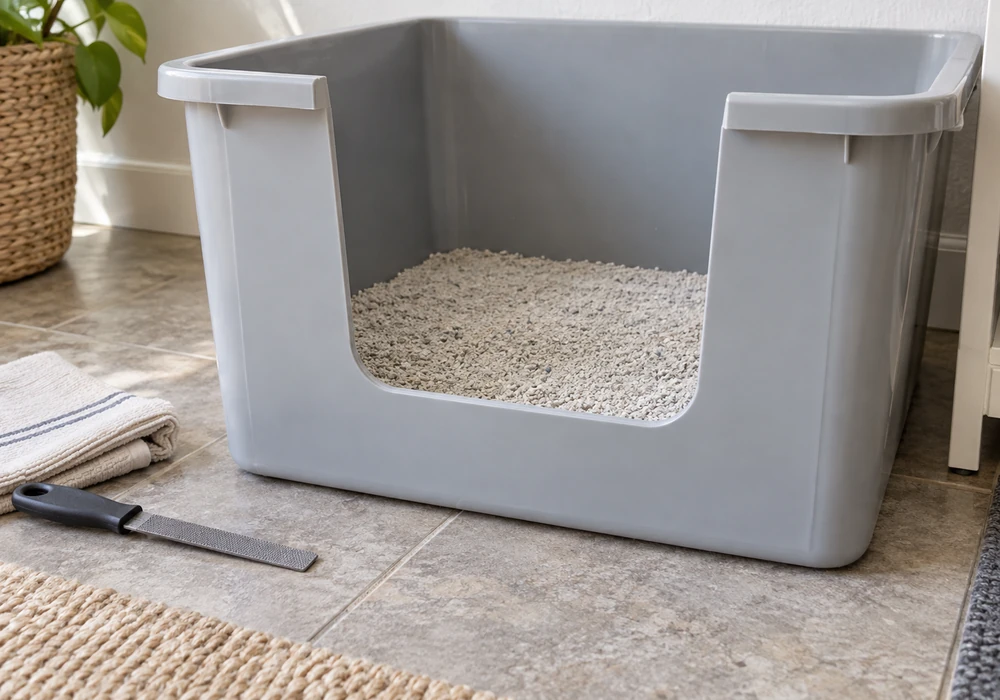
Finish the edge itself. Tape can loosen during washing, scratching, or chewing and should not cover an unfinished cut. Any additional edging must be secure and cleanable. If you cannot make a litter box with a smooth, strong entrance, choose an uncut tray instead. Replace cracked bins, and do not drill drainage holes.
5. Check the Finished Litter Box
Inspect the box empty, then again after adding litter. Confirm that it is stable before allowing your cat to try it.
| Check | What to look for |
|---|---|
| Edges and corners | Smooth surfaces with no sharp fragments or cloth snags. |
| Base and lower walls | No cracks or leaks during a shallow water check below the entrance. |
| Stability | The box stays level without sliding, rocking, or collapsing during ordinary handling. |
| Cleaning access | The scoop and brush can reach the floor and every corner. |
| Entrance and approach | A clear route, a manageable step, and no loose edging or curled mat corners. |
Once these checks pass, watch your cat enter, turn, and leave voluntarily. Smooth an unsafe edge before use. Replace a leaking or damaged container rather than trying to hold it together with tape.
6. Help Your Cat Try the New Litter Box
After you make a litter box, offer it alongside your cat’s usual one. Use familiar litter and let your cat investigate at its own pace. Do not hold your cat inside, move its paws through the litter, or remove the old box to force a choice.
Choose a quiet, accessible location away from food, water, bedding, and appliances that start suddenly. Leave enough space around the entrance for an easy approach and exit.
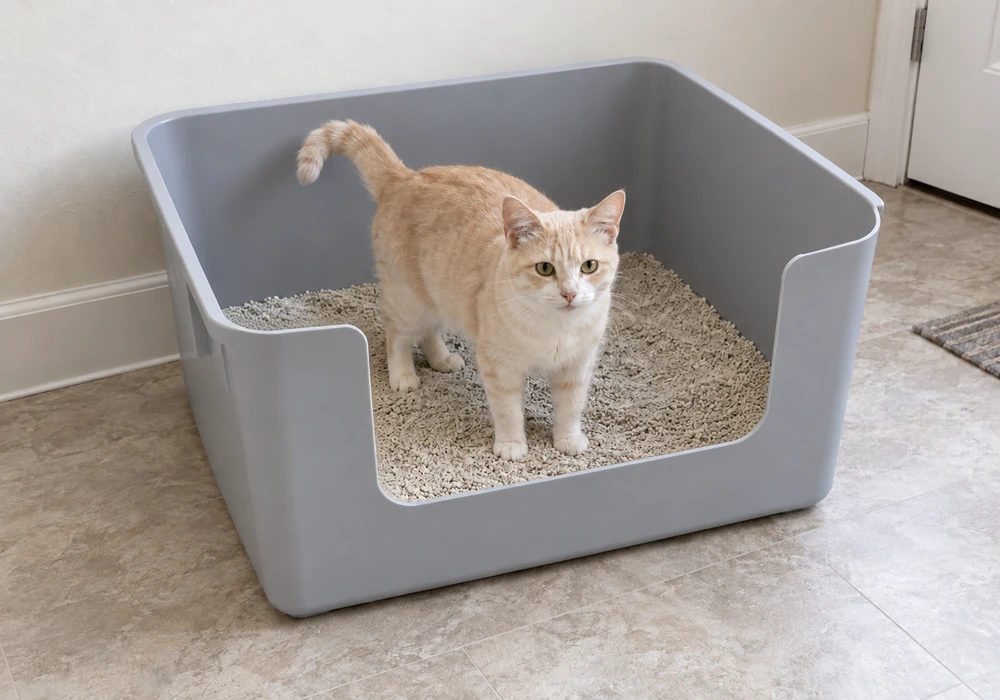
Look for repeated, comfortable use for both urination and bowel movements. Hesitating at the entrance, balancing on the rim, or leaving the rear end outside can signal a poor fit. For a kitten learning the routine, see our guide to litter training kittens.
Plan for one box per cat plus one extra, in separate accessible locations. A large homemade box still counts as one box. If another cat blocks the route, our guide to cat stress relief at home explains how to make shared spaces easier to use.
Common DIY Litter Box Problems and Fixes
- Your cat’s rear end stays outside
- Check the usable floor space and doorway position. A roomier container may help your cat get fully inside. New or persistent changes in posture also need veterinary assessment.
- Urine goes over the back
- Taller rear walls may help contain it, but keep the entrance low enough to use. A new change in urinating posture can reflect discomfort and needs veterinary attention.
- Litter spills through the entrance
- Check the fill level and digging pattern. A flat catch mat may help. Avoid raising the step so much that your cat struggles to enter.
- The floor underneath is wet
- Check whether urine is escaping over the entrance, running down the outside, or leaking through a crack. Empty and inspect the box; replace a leaking container.
- Your cat avoids the new box
- Check odor, movement, entry height, litter texture, and location. Keep the familiar box available and change one likely problem at a time. Sudden or persistent accidents need a veterinary check.
Straining With Little or No Urine Is an Emergency
Repeated attempts to urinate with little or no urine can indicate a urinary blockage. Seek immediate veterinary care; do not wait overnight or press on your cat’s abdomen. Cornell’s urinary-disease guidance explains why this requires urgent treatment. Blood or painful urination also needs prompt veterinary attention.
Cleaning and Replacing Your Homemade Litter Box
Scoop at least daily, removing feces and urine-soaked litter as appropriate for the litter type. Empty and wash the box and scoop with mild dish detergent about weekly, or sooner when soiled. Rinse thoroughly and dry before refilling, following VCA’s advice on cleaning litter supplies. Keep another usable box available during cleaning.
When you make a litter box from a storage bin, check the cut edge, base, and corners each time you empty it. Replace the container if it cracks, leaks, loses stability, develops loose edging, or can no longer be cleaned thoroughly. There is no fixed replacement date.
Clean away from food preparation areas and wash your hands afterward. If disinfection is needed, follow the product’s dilution, contact time, rinsing, drying, and surface-compatibility instructions. Keep your cat away until the item is safe to use. Never mix cleaning chemicals, and avoid phenol-containing disinfectants, which cats cannot detoxify efficiently. Any cat that keeps avoiding the box despite these changes should be checked for a medical cause; our overview of cat health explains the signs worth raising.
Can You Make a Litter Box Fit Inside Furniture?
Yes, provided the enclosure leaves enough room for your cat to stand, turn, enter, and leave comfortably. Measure the available space before choosing the tray, and keep it fully removable for cleaning. Ventilation and an unobstructed exit matter as much as appearance.
For a simple screen, Cats Protection suggests an open-top cardboard surround with openings on two adjacent sides. The washable tray must hold the litter and urine; replace the cardboard if it becomes wet or contaminated. Start with the open tray and confirm comfortable use before adding a surround.
This guide draws on our own experience of living with cats and on published shelter and veterinary guidance; it is general information, not a substitute for veterinary advice. Call your veterinarian if a cat strains to urinate with little or nothing produced, cries while using the box, passes blood, or stops using it entirely — a blockage needs care the same day.